[fusion_builder_container hundred_percent="no" hundred_percent_height="no" hundred_percent_height_scroll="no" hundred_percent_height_center_content="yes" equal_height_columns="no" menu_anchor="" hide_on_mobile="small-visibility,medium-visibility,large-visibility" status="published" publish_date="" class="" id="" background_color="" background_image="" background_position="center center" background_repeat="no-repeat" fade="no" background_parallax="none" enable_mobile="no" parallax_speed="0.3" video_mp4="" video_webm="" video_ogv="" video_url="" video_aspect_ratio="16:9" video_loop="yes" video_mute="yes" video_preview_image="" border_size="" border_color="" border_style="solid" margin_top="" margin_bottom="" padding_top="" padding_right="" padding_bottom="" padding_left=""][fusion_builder_row][fusion_builder_column type="1_1" layout="1_1" spacing="" center_content="no" link="" target="_self" min_height="" hide_on_mobile="small-visibility,medium-visibility,large-visibility" class="" id="" background_color="" background_image="" background_image_id="" background_position="left top" background_repeat="no-repeat" hover_type="none" border_size="0" border_color="" border_style="solid" border_position="all" padding_top="" padding_right="" padding_bottom="" padding_left="" margin_top="" margin_bottom="" animation_type="" animation_direction="left" animation_speed="0.3" animation_offset="" last="no"][fusion_text columns="" column_min_width="" column_spacing="" rule_style="default" rule_size="" rule_color="" hide_on_mobile="small-visibility,medium-visibility,large-visibility" class="" id=""]

На сегодняшний день я знаю две версии прошивок для Alfawise EKEN V50 Pro:

[/fusion_text][fusion_title hide_on_mobile="small-visibility,medium-visibility,large-visibility" class="" id="" content_align="center" size="2" font_size="" line_height="" letter_spacing="" margin_top="" margin_bottom="" text_color="" style_type="default" sep_color=""]

Как сделать бекап прошивки?

[/fusion_title][fusion_text columns="" column_min_width="" column_spacing="" rule_style="default" rule_size="" rule_color="" hide_on_mobile="small-visibility,medium-visibility,large-visibility" class="" id=""]

Первым делом нужно вот здесь скачать архив и найти в нём файл под названием backup.sh. После того, как вы перенесёте скрипт слива прошивки на карточку (карточку форматировать не надо), включаете Telnet.

Как включить telnet

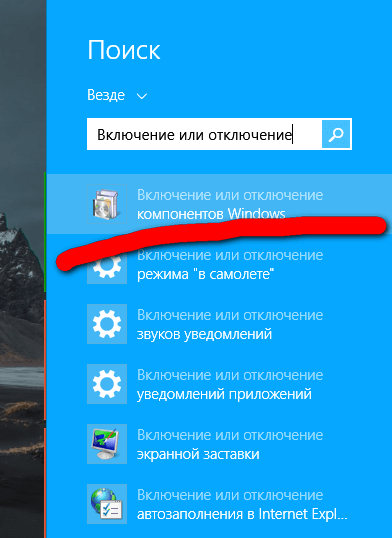
В Windows (у меня 8.1) нажимаем Пуск – в окошке поиска пишем «Включение или отключение компонентов Windows» (можно и первых три слова – система выдаст все подходящие результаты (см. скриншот).
[/fusion_text][fusion_imageframe image_id="5506|full" max_width="" style_type="glow" blur="" stylecolor="" hover_type="none" bordersize="" bordercolor="" borderradius="" align="center" lightbox="no" gallery_id="" lightbox_image="" lightbox_image_id="" alt="" link="" linktarget="_self" hide_on_mobile="small-visibility,medium-visibility,large-visibility" class="" id="" animation_type="" animation_direction="left" animation_speed="0.3" animation_offset=""]https://tripchit.com/wp-content/uploads/2019/03/screenshot1__.png[/fusion_imageframe][fusion_text columns="" column_min_width="" column_spacing="" rule_style="default" rule_size="" rule_color="" hide_on_mobile="small-visibility,medium-visibility,large-visibility" class="" id=""]

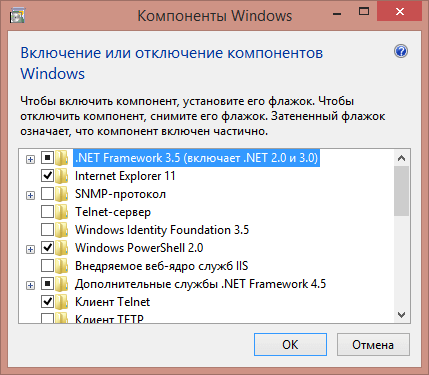
В открывшемся окне ставьте галочку напротив нужного пункта (клиент Tenlet), жмёте ОК и ждёте, пока система закончит установку.
[/fusion_text][fusion_imageframe image_id="5509|full" max_width="" style_type="glow" blur="" stylecolor="" hover_type="none" bordersize="" bordercolor="" borderradius="" align="center" lightbox="no" gallery_id="" lightbox_image="" lightbox_image_id="" alt="" link="" linktarget="_self" hide_on_mobile="small-visibility,medium-visibility,large-visibility" class="" id="" animation_type="" animation_direction="left" animation_speed="0.3" animation_offset=""]https://tripchit.com/wp-content/uploads/2019/03/screenshot2__.png[/fusion_imageframe][fusion_text columns="" column_min_width="" column_spacing="" rule_style="default" rule_size="" rule_color="" hide_on_mobile="small-visibility,medium-visibility,large-visibility" class="" id=""]

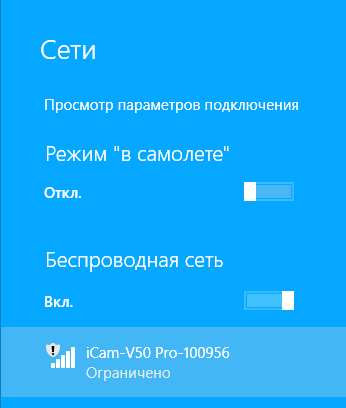
После этого включаете камеру, нажимаете на ней кнопку WIFI, открываете список доступных подключений, находите там свою камеру и жмёте «подключиться».
[/fusion_text][fusion_imageframe image_id="5512|full" max_width="" style_type="glow" blur="" stylecolor="" hover_type="none" bordersize="" bordercolor="" borderradius="" align="center" lightbox="no" gallery_id="" lightbox_image="" lightbox_image_id="" alt="" link="" linktarget="_self" hide_on_mobile="small-visibility,medium-visibility,large-visibility" class="" id="" animation_type="" animation_direction="left" animation_speed="0.3" animation_offset=""]https://tripchit.com/wp-content/uploads/2019/03/screenshot3__.png[/fusion_imageframe][fusion_text columns="" column_min_width="" column_spacing="" rule_style="default" rule_size="" rule_color="" hide_on_mobile="small-visibility,medium-visibility,large-visibility" class="" id=""]

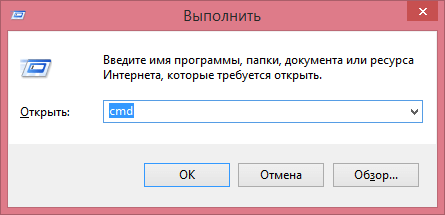
Дальше открываете комбинацией клавиш Win+R окно «выполнить», пишете cmd и нажимаете Enter.
[/fusion_text][fusion_imageframe image_id="5515|full" max_width="" style_type="glow" blur="" stylecolor="" hover_type="none" bordersize="" bordercolor="" borderradius="" align="center" lightbox="no" gallery_id="" lightbox_image="" lightbox_image_id="" alt="" link="" linktarget="_self" hide_on_mobile="small-visibility,medium-visibility,large-visibility" class="" id="" animation_type="" animation_direction="left" animation_speed="0.3" animation_offset=""]https://tripchit.com/wp-content/uploads/2019/03/screenshot4__.png[/fusion_imageframe][fusion_text columns="" column_min_width="" column_spacing="" rule_style="default" rule_size="" rule_color="" hide_on_mobile="small-visibility,medium-visibility,large-visibility" class="" id=""]

В появившемся окне печатаете telnet 192.168.42.1 (или какой там у вашей камеры айпишник), жмёте Enter, вас спрашивают логин (надо ввести root), жмёте Enter и после входа печатаете следующее:

sh /tmp/SD0/backup.sh

Процесс пошёл, происходит сброс прошивки на карту и её архивирование. Всё это дело занимает порядка десяти минут, после чего появляется сообщение, что процесс окончен, можно всё отключать.

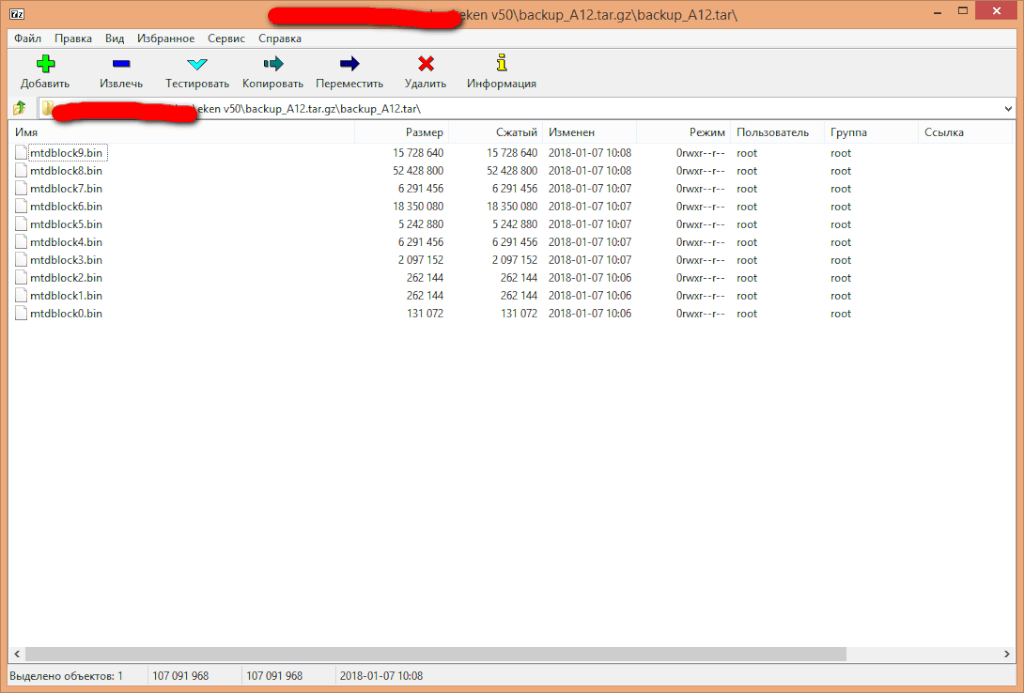
Прошивка у вас на карте, в корневой папке, файл имеет название примерно следующее: backup_A12.tar.gz – это архив в архиве, внутри которого будет что-то типа такого:
[/fusion_text][fusion_imageframe image_id="5518|large" max_width="" style_type="glow" blur="" stylecolor="" hover_type="none" bordersize="" bordercolor="" borderradius="" align="center" lightbox="no" gallery_id="" lightbox_image="" lightbox_image_id="" alt="" link="" linktarget="_self" hide_on_mobile="small-visibility,medium-visibility,large-visibility" class="" id="" animation_type="" animation_direction="left" animation_speed="0.3" animation_offset=""]https://tripchit.com/wp-content/uploads/2019/03/screenshot5__-1024x693.png[/fusion_imageframe][fusion_text columns="" column_min_width="" column_spacing="" rule_style="default" rule_size="" rule_color="" hide_on_mobile="small-visibility,medium-visibility,large-visibility" class="" id=""]

Пользуйтесь на здоровье!

А как заливать бекап прошивки обратно в камеру – это уже совсем другая история.

[/fusion_text][/fusion_builder_column][/fusion_builder_row][/fusion_builder_container]